Now for many people games on the PC and having a copy protection packed in with it, is a natural thing. I for one am guilty of buying a few PC games that have some copy protection on them. The downside of this is when the copy protection of the game causes issue with the computer. I myself have had several computers have massive messups from such copy protection schemes... These mainly dealing with the things they do to the computer. Some mess with programs that like to monitor processes (the task manager in windows and antivirus software) while others will watch for burning software and disable it (temporarily). here's a little history lesson.
In the earliest days, the copy protection was, look up a word in the manual that the game asked for before it would allow you to play. That's not so bad considering that the cost to make a copy of the manual would not have been worth it. Some games didn't bother to have protection, but would have a small line of code that if it wasn't on the original disk (floppy) that it would let you get to the end of the game but as soon as you go to the last area it would basically say, since you copied this game the final boss burns you to a crisp and eats you, buy a copy for yourself to stand a chance. nothing quite like a little 4th wall joke really. and the idea was that if you wanted to defeat the game completely you have to buy the game. Who knows maybe in the copy process it caused a certain item in game to disappear. But the early days were basically they made jokes at the pirates expense. Was that so bad?
Later on, when the CD came about with games on them, new forms of copy protection were created. These early ones were basically nothing more than a disc check which could be defeated by editing a text file. However some didn't need the disc check as they stored audio content on the disc and required the disc to play the in game music. This isn't the easiest form of thing to copy but it can be done. these simple copy protections didn't harm anything, just made you have to have the original disc in the drive to play. How it came to pass that they decided to make this simple concept destructive is a very good question indeed.
fast forward a few years and you will see safedisc, securom, starforce, cdcops, etc. many of these early versions were rather tame (safedisc for example was just a more complex disc check system with an encrypted disc) where some of them were absolutely dangerous to a PC's health due to the ways that it would check for a disc. For example, in some of them if a burner drive was used, it's speed would over time be diminished. I personally have not experienced this issue but then again I never had games that used starforce. SecuRom did some interesting things with scanning programming, even windows own task manager. There are even some bits from these that make disc burning software, antivirus software, and such... Why would they make these destructive bits of code? To protect their intellectual property? I doubt that highly as clever hackers have just as easily cracked these codes and make the game actually playable... What does this mean? it means that the copy protection only effects the average customer instead of stopping pirates. And to those hackers that do this, they see it as a challenge when a copy protection is made to be strong, so they make the game playable for themselves and sometimes will make the parts required to make the game more easily playable, available to the internet... After that the people with less morals start making copies of the games and include the hackers modified code to make the game playable without the legit disc. So who exactly are these companies punishing?
a little further down the road now and you will see the ones I hate the most... Online verification systems. These nasty bits of code require you to be online for you to be able to even start the game. Now to many this doesn't seem like a big deal, but for people like me that have a gaming rig set up offline, this can be quite the issue because we can't "verify" with the company server that our copy is legit... and what happens when the said server goes down? Sorry but it means you can't play a game that you have rightfully paid for. Enjoy your coaster if it is a cd/dvd installed game. The biggest culprit in this right now is Valve and their Steam. Though EA is getting just as bad, and in time I see them getting right up there with Valve. To me this seems completely unnecessary especially for offline gaming rigs (or internal network only gaming setups AKA LAN parties) and with games such as Duke Nukem Forever, which everyone has been waiting for since the late nineties, and some of these Fans remembers playing it's predecessor Duke Nukem 3D will be sorely disappointed to find out that the game that they have been waiting for so long, will requires online verification through steam. I know I am disappointed with this discovery and hope to see a change before it's launch.
But that's a tad off topic. I put this question out to all of you, including those that may be working for these companies that produce such malicious code... Why? Why bother with adding such pointless code? Pirates are going to pirate whether you like it or not. No matter how hard the protection is made to crack, it will be cracked, no exceptions. So why punish the average customer that would buy your games in the first place? Because that is exactly what you are doing with using any form of copy protection. Talk about aiming for the broad side of the barn and hitting the ground.
Tuesday, March 29, 2011
Monday, March 28, 2011
Using the Gimp to make a shadow
Okay todays posting is a simple FAQ for how to use The gimp and make a shadow. This trick can also be applied to photoshop but I don't remember how photoshop does certain things so here we go then.
There is a simple shadow that is available in the gimp called drop shadow but that makes the image seem to be floating and that is not the effect I am intending to let you know about. for this one we are going to do a perspective shadow. (don't ask I may have the name of this wrong but here me out.)
 First a base image is required that you intend to have the object in, if the object is already in the image that is great then all you have to do is select it using the free select tool. Make sure to take your time as you do this as the more points that you use, the more round the selected object will be and for this the more realistic the shadow will be. Once you have your selected object fully surrounded you will want to copy and paste it twice in the same location that it started in and making sure that each new pasting gets it's own layer. This is the important part here as you will need these two layers later.
 Now for intents and purposes I am sort of cheating as I had a pre-made image with transparency and an empty background. So here is where I am going to start. So I paste the two copies as layers into the background image. THis can be easily done by hitting ctrl+v but that pastes it as a floating layer that will have to be anchored to a layer which takes longer so I just use edit > paste as > new layer. Make sure to do this twice as was mentioned earlier to have two of what you are going to work with.
Once that is done make sure that those new layers pasted where you wanted, if they didn't then you will want to use the move tool to position them. at this point feel free to move one of the pasted layers to the side so that you can more easily manipulate it separately from the other layer.
 Next you will want to desaturate one of the new pasted layers. This is done by the Color menu and then selecting desaturate. this takes the color out of that layer and leaves you with a grayscale. The styles in the dialog box of desaturization isn't really important for this so pick one and let it do it's thing. For this example I used the luminosity option if you really wanted to know. Moving on from there you will now want to go back to the color menu and chose "brightness-contrast..." this will bring up a dialog of brightness and contrast controls. (for more information on what this means follow this link,) you will now take the contrast slider and bottom it out to the left. This will result in a gray blob where your layer used to be. (see right) keep in mind that this is still a separate layer. Now that we have that settled you will go to the side window which has the layers and you will, after making sure that your gray blob layer is selected, reduce it's opacity. Not to much as this will result in it not being seen. just enough that it looks like a shadow. You will want to now position this "shadow" layer over your main object that you wish to give the shadow. Positioning is important as you don't want the shadow to not be connected to it's host object (unless the host object is in the air in which you likely wouldn't be dealing with this sort of shadow)
Now come the part that will make it look like a shadow instead of a shading over your object. You will be doing this by going to tools > transform tools. Then you will select perspective for your selected shadow layer. This is where your own creativity comes into play, where do you want the light source to be from is one thing you will want to think about as you are doing this step. in this example I am going to have the light source being the off screen setting sun that I am going to say is to the right of the image. You will click on the corners of the shadow layer and move them around to adjust it's position to look like it's caused by the light source. Once again this is your own creative point. Think about where you want the light source to be and make the shadow stretch in the opposite direction.the end result will be as follows
 Now we are not quite done yet, as there is still one small issue... the shadow looks to be on top of the object instead of stretching from the bottom of it. This however is a simple fix. At this point all you have to do is rearrange your layers so that the shadow is under your object.


Once you have finished with rearranging of the layers you will have a shadow stretching from an object. Congratulations. You now know how to make simple but realistic shadows using The Gimp. Hope to see some amazing art from you in the future. Until next time.

Feel free to leave a comment, even if you are anonymous.
There is a simple shadow that is available in the gimp called drop shadow but that makes the image seem to be floating and that is not the effect I am intending to let you know about. for this one we are going to do a perspective shadow. (don't ask I may have the name of this wrong but here me out.)
First a base image is required that you intend to have the object in, if the object is already in the image that is great then all you have to do is select it using the free select tool. Make sure to take your time as you do this as the more points that you use, the more round the selected object will be and for this the more realistic the shadow will be. Once you have your selected object fully surrounded you will want to copy and paste it twice in the same location that it started in and making sure that each new pasting gets it's own layer. This is the important part here as you will need these two layers later. |
| pre-made parts displayed in the gimp, bonus points if you know what the image is from. |
 Now for intents and purposes I am sort of cheating as I had a pre-made image with transparency and an empty background. So here is where I am going to start. So I paste the two copies as layers into the background image. THis can be easily done by hitting ctrl+v but that pastes it as a floating layer that will have to be anchored to a layer which takes longer so I just use edit > paste as > new layer. Make sure to do this twice as was mentioned earlier to have two of what you are going to work with.
Once that is done make sure that those new layers pasted where you wanted, if they didn't then you will want to use the move tool to position them. at this point feel free to move one of the pasted layers to the side so that you can more easily manipulate it separately from the other layer.
 Next you will want to desaturate one of the new pasted layers. This is done by the Color menu and then selecting desaturate. this takes the color out of that layer and leaves you with a grayscale. The styles in the dialog box of desaturization isn't really important for this so pick one and let it do it's thing. For this example I used the luminosity option if you really wanted to know. Moving on from there you will now want to go back to the color menu and chose "brightness-contrast..." this will bring up a dialog of brightness and contrast controls. (for more information on what this means follow this link,) you will now take the contrast slider and bottom it out to the left. This will result in a gray blob where your layer used to be. (see right) keep in mind that this is still a separate layer. Now that we have that settled you will go to the side window which has the layers and you will, after making sure that your gray blob layer is selected, reduce it's opacity. Not to much as this will result in it not being seen. just enough that it looks like a shadow. You will want to now position this "shadow" layer over your main object that you wish to give the shadow. Positioning is important as you don't want the shadow to not be connected to it's host object (unless the host object is in the air in which you likely wouldn't be dealing with this sort of shadow)
Now come the part that will make it look like a shadow instead of a shading over your object. You will be doing this by going to tools > transform tools. Then you will select perspective for your selected shadow layer. This is where your own creativity comes into play, where do you want the light source to be from is one thing you will want to think about as you are doing this step. in this example I am going to have the light source being the off screen setting sun that I am going to say is to the right of the image. You will click on the corners of the shadow layer and move them around to adjust it's position to look like it's caused by the light source. Once again this is your own creative point. Think about where you want the light source to be and make the shadow stretch in the opposite direction.the end result will be as follows


Once you have finished with rearranging of the layers you will have a shadow stretching from an object. Congratulations. You now know how to make simple but realistic shadows using The Gimp. Hope to see some amazing art from you in the future. Until next time.

Feel free to leave a comment, even if you are anonymous.
Saturday, March 26, 2011
Tools of art, for those that want to do art with their computers
Today I will share with you something that many people likely already know. Art with the Computers. This can be as simple as using Paint in windows or using something more complex such as Photoshop. Anybody that does art and posted it to the internet has used something to touch up their work, even the people that use scanners and import physical drawings into there computers. Shoot even I've done that once or twice. Now Some of the digital tools that are available for your use are very powerful and some are very simple. and I will only be covering the ones I have used over the years. So lets start with the most obvious.
Microsoft Paint
This program has comes free with every windows system since the early days. It's abilities have evolved since it's early days though in those early versions you couldn't save in anything but it's proprietary format and bmp. it has since significantly evolved but it's basic purpose stays the same. It's still a simple image program that is useful to someone that doesn't expect to be manipulating photo's I realize yes you can do things like remove red eye but that's a bit trickier than it is in regular photo editing software because with paint you would have to do everything manually. That is beside the point though. Many people use Paint to make Pixel art though the reason for this should be obvious because you can zoom it in so close and can paint one pixel at a time. This can be fun, but time consuming at the same time, but it beats using a full image manipulator for simple things. I personally use it for taking screen shots of my desktop when someone asks me for one. SO my vote for MS Paint (or paint .net depending on system version you have) is that is is simple but useful at the same time.
For those of you that are not on windows systems you usually don't get a simple paint program and have to find one. This goes for Linux and Mac OS X as (usually) neither of these have a simple painting program by default. Some would argue that Mac OS (classic) had some but hardly anybody uses those in a modern computer. So I located two painting programs that will work. The first is XPaint. This can be installed on any Unix or Unix like system (yes this includes Macintosh) for Linux this is a simple install as it has very few dependencies and is usually available within the package installer. for Mac however installing Xpaint requires the installation of the X11 system to the OS. this does two things, it makes your Mac able to run programs that are compiled for linux, but it makes the menus (file edit view help etc.) show up on the window instead of the top bar (only for those programs mind you). Which means the interface is a bit messy to a mac user. Not to mention how much extra difficulty there would be for installing it. A simpler solution is to get Tuxpaint. The interface is sort of children oriented, but it will get the job done and it easily mac installable, no unnecessary installations required. but once again the interface is sort of Children oriented so you will find cartoony graphics here an there, but it has a little more tools and tricks available that XPaint and MS Paint doesn't have. (not many but you get the idea)
Now if you are looking for something more sophisticated than the basic paint programs you will likely be looking into Raster graphic and Vector graphic editing programs. Of these, the ones I have used were Photoshop, The Gimp, Illustrator, and Inkscape. Photoshop and Illustrator are great tools, however you have to realize that that they cost a lot of money as they are "Professional" computer arts tools. Which for some reason entails a hefty cost. $699 for just the basic (current) version of photoshop and $599 for illustrator. Seems pricy since these programs integrate with certain other programs that you would also have to purchase (not covered because I've not used the others) but you might as well get the entire creative suite for $1299 so you get all the parts. But to someone that doesn't have the money for all of this, and doesn't want to break the law of course... would look for alternatives. The Gimp and Inkscape fill the bulk of the void there for me and are installable on all operating systems. I'm not saying that you should use The Gimp or Inkskape over Photoshop or Illustrator, but the last time I used either of those was back in a college class where I got to use a computer lab with the programs already installed. So for my own personal photo editing needs I have just made due with using The Gimp and Inkscape (the Gimp more than anything really).
But back on topic here Photoshop has a lot of things you can do with it. Some things include the basic removal of certain details from an image (like maybe text where it shouldn't be or isn't wanted) or red eye removal. Or maybe you wish to make your own scene and create a shadow of an object to change the perspective of light in the image. All kinds of art related stuff can be done and I haven't even fully scratched the surface yet. The issue I see is that if you want the newest version of the software, you also have to have some rather powerful hardware to make it function well. Where as the Gimp can be run on hardware from ten years ago. (p3 ring any bells?) it will just run a little sluggish compared to newer hardware. Now so far from my experience with The Gimp and Photoshop, I have been able to do just about everything I have wanted to do in either program, the issue being that in The Gimp the interface is quite different than Photoshop. So if you are coming from Photoshop to the Gimp you will have to relearn the interface like I did. Granted it's gotten better but it's still a bit out of order in my opinion.
For illustrator... I didn't use it enough to fully figure out what it can do other than it being vector graphics. Inkscape I just play with from time to time... so moving on.
As for hardware art tools, which I know is a touch off topic... A simple Wacom tablet can make things really interesting. These amazing tools can be used on any of the mentioned programs here and allows you to draw right into the computer. I know this seems like a shameless plug but I am not being paid by Wacom to say this. Though I wish I was.
The thing is that this post only scratches the surface of the tools available. There are far more than what is covered here. So you will have to take a look for yourself to find what else there is available to you. I encourage you all to look into alternatives, especially if they can save you hard earned money when you aren't trying to do something professionally. So until next time everyone stay safe out there.
Microsoft Paint
 |
| An example of Paint from windows 7 |
 | ||
| This is XPaint, Image borrowed from Wikipedia |
Now if you are looking for something more sophisticated than the basic paint programs you will likely be looking into Raster graphic and Vector graphic editing programs. Of these, the ones I have used were Photoshop, The Gimp, Illustrator, and Inkscape. Photoshop and Illustrator are great tools, however you have to realize that that they cost a lot of money as they are "Professional" computer arts tools. Which for some reason entails a hefty cost. $699 for just the basic (current) version of photoshop and $599 for illustrator. Seems pricy since these programs integrate with certain other programs that you would also have to purchase (not covered because I've not used the others) but you might as well get the entire creative suite for $1299 so you get all the parts. But to someone that doesn't have the money for all of this, and doesn't want to break the law of course... would look for alternatives. The Gimp and Inkscape fill the bulk of the void there for me and are installable on all operating systems. I'm not saying that you should use The Gimp or Inkskape over Photoshop or Illustrator, but the last time I used either of those was back in a college class where I got to use a computer lab with the programs already installed. So for my own personal photo editing needs I have just made due with using The Gimp and Inkscape (the Gimp more than anything really).
 |
| A screenshot of The Gimp |
For illustrator... I didn't use it enough to fully figure out what it can do other than it being vector graphics. Inkscape I just play with from time to time... so moving on.
As for hardware art tools, which I know is a touch off topic... A simple Wacom tablet can make things really interesting. These amazing tools can be used on any of the mentioned programs here and allows you to draw right into the computer. I know this seems like a shameless plug but I am not being paid by Wacom to say this. Though I wish I was.
The thing is that this post only scratches the surface of the tools available. There are far more than what is covered here. So you will have to take a look for yourself to find what else there is available to you. I encourage you all to look into alternatives, especially if they can save you hard earned money when you aren't trying to do something professionally. So until next time everyone stay safe out there.
Friday, March 25, 2011
Eating on the cheap and still liking it.
How many of you out there actually live on a few dollars a day? many college students probably do So I figured for this post I would help them out. I was there at one point myself. As long as you have access to a heat source (a stove, a hotplate, access to a microwave, you get the idea there.) you will be able to make a reasonably healthy meal.
While at the grocery you will want the staple item known as Ramen noodles, two packs should do it. Yes I know this seems obvious, but hear me out. Next you will need some meat, for this I chose some boneless chicken breast (unless you want to debone them yourself which would save you money but not time). some salt and pepper packs from a mcdonalds or burger king is a good idea for this. Some Vegetables such as celery, carrots, peas, are good ideas as well feel free to experiment with different ingredients but keep in mind this is intended to be cheap, easy, and not cost to much in the long run.
So lets make a simple list here...
Ramen Noodles x2 packs (beware of the flavor packs you chose and compare to the meat used)
Vegetables: carrots, peas, celery, etc. (canned is helpful in making this go farther) chop what is necessary.
meat of your choice (don't go overboard here if you want to keep things cheap)
First you will want to cook your meat long enough to get it over the safe temperature level (I'd shoot for 190 degrees F or higher to be safe). You don't have to cook all the way through as that will weaken the flavor later (unless chicken in which case use your best judgement). Make sure to use some of that salt and pepper you got from that fast food place (mix together and rub lightly into the meat before cooking) Once you got it to that point remove the meat from the heat and start the Ramen noodles water (if you didn't already, if you did, bravo for you because you saved yourself some time and effort) once you get the water boiling (follow directions on ramen noodle packs but subtract about a half cup of water) pour in the canned vegetables and the chopped up ones. allow to boil. While waiting for it to boil break up the meat into manageable bits for a fork or spoon. Drop it in the water along with the noodles. Once the Noodles are nice and loosened up you will have a nice soup that you will have leftovers for days that you can eat. Make sure to add at least one of the flavor packs from the Ramen packs for a little boost in flavor (two if you like it that way)
If you used chicken just make sure the pieces got fully cooked. The last thing you want is to eat half cooked chicken...
Also to note yes you can use 1 pack of noodles instead of 2 but I used 2 to compensate for the excess water in the cans of vegetables that you add., you could always drain off excess water and have a chunky soup. However using this simple idea I was able to feed three adults and three kids with this and there was still leftovers. (don't ask about that it just happened that way)
Total cost? um at the time that was about $4.75. But if one person is eating it, it could last you for several meals. Throw in a slice of bread or even a full sandwich if you have the materials for it, and each meal you get out of it will cost you far less than just going to McDonalds and getting a mcdouble small fry and a small drink. Not to mention give you that satisfying full feeling.
Best cooking advice I can give is make sure it is safely cooked... and taste before serving.
If you have other ideas or recipes you'd like to share feel free to comment.
Welcome to my blog.
This blog will contain random things that I decide to post on. Who knows what I may post on but I am sure you won't be disappointed. If you are then tough noogies.
Today's blog will be a simple one. Is Linux truly ready for mainstream? to put it bluntly I say not entirely. The reasoning I have behind this is that Linux in itself is a great OS, but it's user friendliness depends on the person attempting to use it. Sure, you can take any of the user interfaces available for Linux and modify their look to your hearts content, but the ease of doing so depends heavily on which Window manager and desktop environment that you chose.
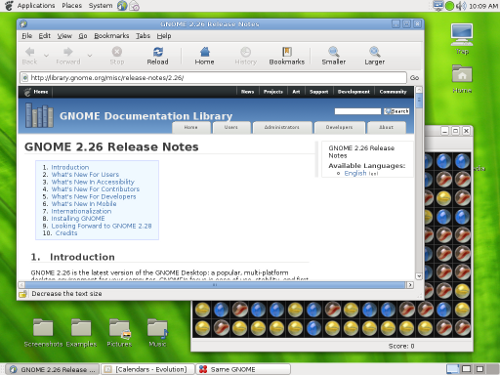 Lets face it, the Average person isn't going to care about the basic look, as long as there is something familiar about it. If the User interface is not familiar, then they won't want it. For example if someone has been using windows for the last 10 years, the odds of them trying a MAC is very slim because the interface is radically different, the same can be said about the default setup for the average Gnome interface (see right, image source URL is This link here also good info on that site as well if you are interested.) To the average Windows or Mac user this interface will likely be a touch confusing to start with. Who really wants to deal with something new when they have been working with something functional for the longest time?
Now interesting to note here, this is only the default setup of Gnome. it does not have to look like this. However I doubt most people that right out of the gate would know how to change this even if the nice people that have been working on the Gnome project for years now have made it exceedingly easy to do. A right click hear, a theme change there, and you could have an interface that would look remarkably like your favorite Operating System.
But enough about interface, lets move on to programs. If say for instance a new game just came out and you want to play it. Well more than likely you would be out of luck because Linux does not have the ability (by default once again) to run Other OS's software. This is mainly due to the fact that most programs for windows, unless they are originally linux programs, are not going to run by default or have a way to install them. There are a few exceptions such as games from ID software (makers of the Doom and Quake series') but as a general rule the linux installer is not provided by default and you have to go to their website after buying the game to get the linux installer. However to return to the original idea here. Say you want Microsoft Office 2007 or maybe some tax program. You will find that none of them mention linux as a requirement. This is because only a small percentage of the world uses linux based OSes. So the companies say "Why bother with linux?" and they leave that support out. If you stick the disk in there and try to install anyway you will find that it won't work unless the linux distribution you installed includes the WINE project, but we'll cover that some other time.
So what do you do now that you have a system that can't use Microsoft office? Well interesting to note, most Linux Distributions come with an either basic office programs (word processor, spreadsheet) or will have an entire office suite. Most of the time these programs will come with some sort of support for the Microsoft office file formats so that someone that is using it won't be completely lost. A reasonable example of a distribution that has a full office suite would be Ubuntu, which comes with OpenOffice.org. Not a bad program if I do say so myself. It does just about everything you would expect from a regular Microsoft office and a little more. But... we are left with one small question... is it user friendly? Well in my opinion I say yes it is, if you are used to the classic setup and not the more "modern" ribbon style. Some things are labeled a little different but it is an easier switch than trying to figure out some wacky new setup.
Connecting to the internet in a Linux distro is usually just as easy as it is in windows if not easier. a right click here and a left click and you are usually connected to a wireless network in no time. Of course there are those times when you have a computer that doesn't have a fully supported piece of hardware, which causes you to not be able to use it. This has vastly improved over the years, but there are still pieces of hardware out there that lack support. In some cases a wireless card may not be supported and the ability to connect to the internet will be stunted by this. What causes this? Usually really new hardware that nobody has had a chance to deal with yet.
Community support... that is something that is touted as being the saving grace of Linux and other Open Source programs. Someone in their basement with some free time writes a line of code to fix an issue and submits it to the community and it is reviewed before being sent out. That is drastically different than closed source programs which all programming is done in house. A community project has an advantage in that there are millions of average people out there that could help, where an in house program only has a team of people to make it. Is that a good thing? It can mean that a bug that is found can be squashed quickly, but there is the opening for someone poisoning the community pool with malware, or at least that's what they would want you to think, that is where the community shines. If it is discovered that something does something malicious, it will be removed quickly. for in house programming, if one of those programmers decided to stick a bit of malicious code into something they are working on, it can likely get sent out with that malicious code on it. Is that likely to happen? Maybe, but the odds of someone risking their job for a silly prank is pretty slim.
Since I mentioned Malicious code, which can include viruses, spyware, adware, worms, trojans, etc. for most of that stuff if you used linux you would be safe from that. However if you were to think about it from an evil hacker's standpoint. "I'm going to write a virus for windows just because more people use it." Do you see where I'm going with this? it gives far more targets to shoot for. Linux in itself is normally safer by design. This dealing with how the system itself is set up. However, any hacker that is worth their salt would know how to hit anything with malicious code. The reason that most don't bother with linux (or MAC for that matter) is because they don't stand to hit enough targets with their code. That doesn't mean you won't see a virus out there that is designed to destroy a linux system (or a MAC once again). Its just highly unlikely because there are far more windows computers out there and many businesses use windows as well.
I will stop there for the moment... Is Linux ready for mainstream? many of the "community" would say yes. but I say that it would take a little more than sticking with the defaults to make a good system for the average user. Are some open source projects however, ready for mainstream... programs such as openoffice.org, Mozilla's own Firefox and Thunderbird. Many people use some of these programs every day. Especially Mozilla Firefox. So I would say in my opinion, that some Open source projects can be mainstream. but Linux, though stable, is not entirely ready.
tl;dr: Linux not ready but some open source projects are.
See you next time. figuratively speaking of course.
Links to things discussed and an extra for those that wish to see a little more.
www.ubuntu.com
www.mozilla.com
www.openoffice.org
www.fedoraproject.org
Today's blog will be a simple one. Is Linux truly ready for mainstream? to put it bluntly I say not entirely. The reasoning I have behind this is that Linux in itself is a great OS, but it's user friendliness depends on the person attempting to use it. Sure, you can take any of the user interfaces available for Linux and modify their look to your hearts content, but the ease of doing so depends heavily on which Window manager and desktop environment that you chose.
Lets face it, the Average person isn't going to care about the basic look, as long as there is something familiar about it. If the User interface is not familiar, then they won't want it. For example if someone has been using windows for the last 10 years, the odds of them trying a MAC is very slim because the interface is radically different, the same can be said about the default setup for the average Gnome interface (see right, image source URL is This link here also good info on that site as well if you are interested.) To the average Windows or Mac user this interface will likely be a touch confusing to start with. Who really wants to deal with something new when they have been working with something functional for the longest time?Now interesting to note here, this is only the default setup of Gnome. it does not have to look like this. However I doubt most people that right out of the gate would know how to change this even if the nice people that have been working on the Gnome project for years now have made it exceedingly easy to do. A right click hear, a theme change there, and you could have an interface that would look remarkably like your favorite Operating System.
But enough about interface, lets move on to programs. If say for instance a new game just came out and you want to play it. Well more than likely you would be out of luck because Linux does not have the ability (by default once again) to run Other OS's software. This is mainly due to the fact that most programs for windows, unless they are originally linux programs, are not going to run by default or have a way to install them. There are a few exceptions such as games from ID software (makers of the Doom and Quake series') but as a general rule the linux installer is not provided by default and you have to go to their website after buying the game to get the linux installer. However to return to the original idea here. Say you want Microsoft Office 2007 or maybe some tax program. You will find that none of them mention linux as a requirement. This is because only a small percentage of the world uses linux based OSes. So the companies say "Why bother with linux?" and they leave that support out. If you stick the disk in there and try to install anyway you will find that it won't work unless the linux distribution you installed includes the WINE project, but we'll cover that some other time.
So what do you do now that you have a system that can't use Microsoft office? Well interesting to note, most Linux Distributions come with an either basic office programs (word processor, spreadsheet) or will have an entire office suite. Most of the time these programs will come with some sort of support for the Microsoft office file formats so that someone that is using it won't be completely lost. A reasonable example of a distribution that has a full office suite would be Ubuntu, which comes with OpenOffice.org. Not a bad program if I do say so myself. It does just about everything you would expect from a regular Microsoft office and a little more. But... we are left with one small question... is it user friendly? Well in my opinion I say yes it is, if you are used to the classic setup and not the more "modern" ribbon style. Some things are labeled a little different but it is an easier switch than trying to figure out some wacky new setup.
Connecting to the internet in a Linux distro is usually just as easy as it is in windows if not easier. a right click here and a left click and you are usually connected to a wireless network in no time. Of course there are those times when you have a computer that doesn't have a fully supported piece of hardware, which causes you to not be able to use it. This has vastly improved over the years, but there are still pieces of hardware out there that lack support. In some cases a wireless card may not be supported and the ability to connect to the internet will be stunted by this. What causes this? Usually really new hardware that nobody has had a chance to deal with yet.
Community support... that is something that is touted as being the saving grace of Linux and other Open Source programs. Someone in their basement with some free time writes a line of code to fix an issue and submits it to the community and it is reviewed before being sent out. That is drastically different than closed source programs which all programming is done in house. A community project has an advantage in that there are millions of average people out there that could help, where an in house program only has a team of people to make it. Is that a good thing? It can mean that a bug that is found can be squashed quickly, but there is the opening for someone poisoning the community pool with malware, or at least that's what they would want you to think, that is where the community shines. If it is discovered that something does something malicious, it will be removed quickly. for in house programming, if one of those programmers decided to stick a bit of malicious code into something they are working on, it can likely get sent out with that malicious code on it. Is that likely to happen? Maybe, but the odds of someone risking their job for a silly prank is pretty slim.
Since I mentioned Malicious code, which can include viruses, spyware, adware, worms, trojans, etc. for most of that stuff if you used linux you would be safe from that. However if you were to think about it from an evil hacker's standpoint. "I'm going to write a virus for windows just because more people use it." Do you see where I'm going with this? it gives far more targets to shoot for. Linux in itself is normally safer by design. This dealing with how the system itself is set up. However, any hacker that is worth their salt would know how to hit anything with malicious code. The reason that most don't bother with linux (or MAC for that matter) is because they don't stand to hit enough targets with their code. That doesn't mean you won't see a virus out there that is designed to destroy a linux system (or a MAC once again). Its just highly unlikely because there are far more windows computers out there and many businesses use windows as well.
I will stop there for the moment... Is Linux ready for mainstream? many of the "community" would say yes. but I say that it would take a little more than sticking with the defaults to make a good system for the average user. Are some open source projects however, ready for mainstream... programs such as openoffice.org, Mozilla's own Firefox and Thunderbird. Many people use some of these programs every day. Especially Mozilla Firefox. So I would say in my opinion, that some Open source projects can be mainstream. but Linux, though stable, is not entirely ready.
tl;dr: Linux not ready but some open source projects are.
See you next time. figuratively speaking of course.
Links to things discussed and an extra for those that wish to see a little more.
www.ubuntu.com
www.mozilla.com
www.openoffice.org
www.fedoraproject.org
Subscribe to:
Comments (Atom)